
 Login
Login


Have you ever wondered how some websites instantly grab attention with smooth, eye-catching scroll effects? That’s the magic of GSAP ScrollTrigger, a powerful animation extension that transforms ordinary websites into interactive experiences.
GSAP ScrollTrigger lets you create animations that respond to a visitor’s scroll position. In WordPress and Elementor, you can use it to build fade-ins, parallax effects, horizontal scrolling, pinned sections, staggered animations, and more.
The best part? You don’t need to be a coding expert.
In this guide, we’ll walk you through how to use GSAP ScrollTrigger in WordPress & Elementor step by step, so you can boost user engagement, improve your site’s storytelling, and create animations that keep visitors hooked.
GSAP ScrollTrigger lets you connect animations to a visitor’s scroll position. In WordPress and Elementor, you can use it to create fade-ins, parallax effects, horizontal scrolling, pinned sections, staggered animations, and scroll-based timelines.
You can add it without code using an Elementor animation addon or manually with GSAP and JavaScript.
What is GSAP ScrollTrigger?
GSAP ScrollTrigger is a powerful plugin for the GreenSock Animation Platform (GSAP) that allows developers and designers to create scroll-based animations. Unlike traditional CSS animations, GSAP animation responds dynamically to the user’s scroll position.
Also, it enables effects like pinning elements, animating properties in sync with scrolling, triggering animations at specific points, and creating seamless parallax or horizontal scroll experiences.
With ScrollTrigger, you can control start and end points, scrub animations in real time, and synchronize multiple elements using timelines. Its high performance ensures smooth animations without affecting website speed.
What Can You Build With GSAP ScrollTrigger?
GSAP ScrollTrigger lets you create engaging scroll-based effects such as fade-ins, parallax movements, horizontal scrolling, pinned sections, staggered animations, and interactive timelines. These effects are useful for making landing pages, portfolios, product showcases, and storytelling websites feel more dynamic and interactive.
| Animation | Best Use Case |
|---|---|
| Fade reveal | Landing pages |
| Parallax | Hero sections |
| Horizontal scroll | Portfolios |
| Pinning | Product storytelling |
| Stagger | Feature cards |
| Split text | Headlines |
| Image reveal | Creative agencies |
| Stack cards | Case studies |
| Scroll-scrubbed video | Product storytelling |
Understanding ScrollTrigger Settings
ScrollTrigger gives you precise control over when an animation starts, how long it runs, and how it responds to scrolling.
Before knowing the methods on how to use the GSAP ScrollTrigger, understanding its core settings makes it much easier from simple reveals to advanced scroll-based interactions.
trigger
The trigger determines which element controls when the animation begins. You can target a section, image, heading, or any other Elementor element using its CSS class or selector.
start
The start setting defines the point in the viewport where the animation should begin. For example, you can make an animation start when the trigger reaches the top, center, or another position within the viewport.
end
The end setting determines where the ScrollTrigger interaction finishes. Adjusting this value gives you control over how much scrolling takes place before the animation reaches its endpoint.
scrub
scrub connects the animation directly to the user’s scrolling progress. Instead of playing independently, the animation moves forward or backward as the visitor scrolls, creating a smooth and interactive effect.
pin
The pin setting keeps an element fixed in place while the surrounding page continues to scroll. It’s particularly useful for creating immersive storytelling sections, product showcases, and scroll-based presentations.
markers
markers are visual guides that help you understand where a ScrollTrigger starts and ends while building an animation. They are especially useful during development and debugging because you can see the trigger positions directly on the page.
toggleActions
toggleActions controls what happens to an animation when the trigger enters or leaves the viewport. It can be used to define whether an animation should play, pause, resume, restart, or reverse as the user scrolls through the trigger area.
Together, these settings turn ScrollTrigger from a simple scroll effect into a flexible animation system. By adjusting the trigger, timing, scrolling behavior, and playback controls, you can create interactions that feel intentional rather than simply decorative.
What are the Ways to Add GSAP ScrollTrigger in WordPress and Elementor?
There are 3 different ways to add GSAP ScrollTrigger in WordPress and Elementor. These are –
- WordPress Plugin
- Add via Elementor (HTML / Custom Code)
- Using GSAP Library via CDN
Let’s discus each of the method one by one.
Method 1: WordPress Plugin
There are countless WordPress plugins available for adding animations, each offering different features and complexity levels. For this tutorial, we’ll focus on Animation Addons, a powerful all-in-one GSAP-based plugin for Elementor to build different types of animated features for your website.
It comes with 300+ fully built websites, 2,000+ professionally designed page templates and 10,000+ modern, ready-to-use section templates. Moreover, you will get 100+ exclusive widgets and 25+ advanced Elementor extensions to create stunning animated websites.
You get a custom animation builder too, so you can make your own effects. You can make animated websites quickly and easily with all the tools and ready-made templates that are already out there.
Now, let’s look at an example of a step-by-step guide on how to use GSAP ScrollTrigger in WordPress.
Step 1: Install Animation Addons
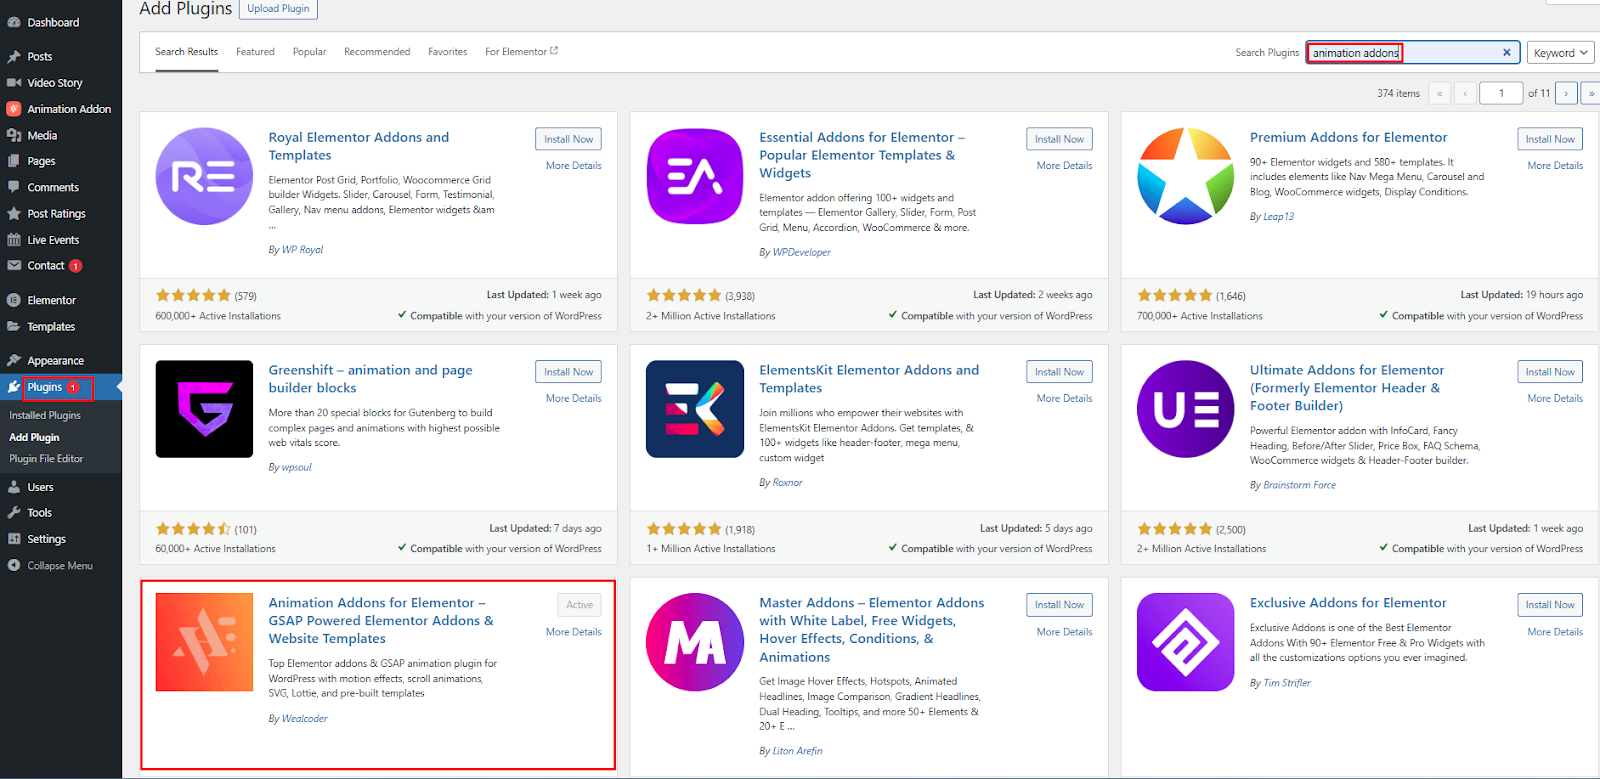
First, you have to install Animation Addons for your WordPress website. For that, go to your dashboard first. Then Plugins>Add Plugin. Search Animation Addons, install and activate it.
Step 2: Enable ScrollTrigger Extension
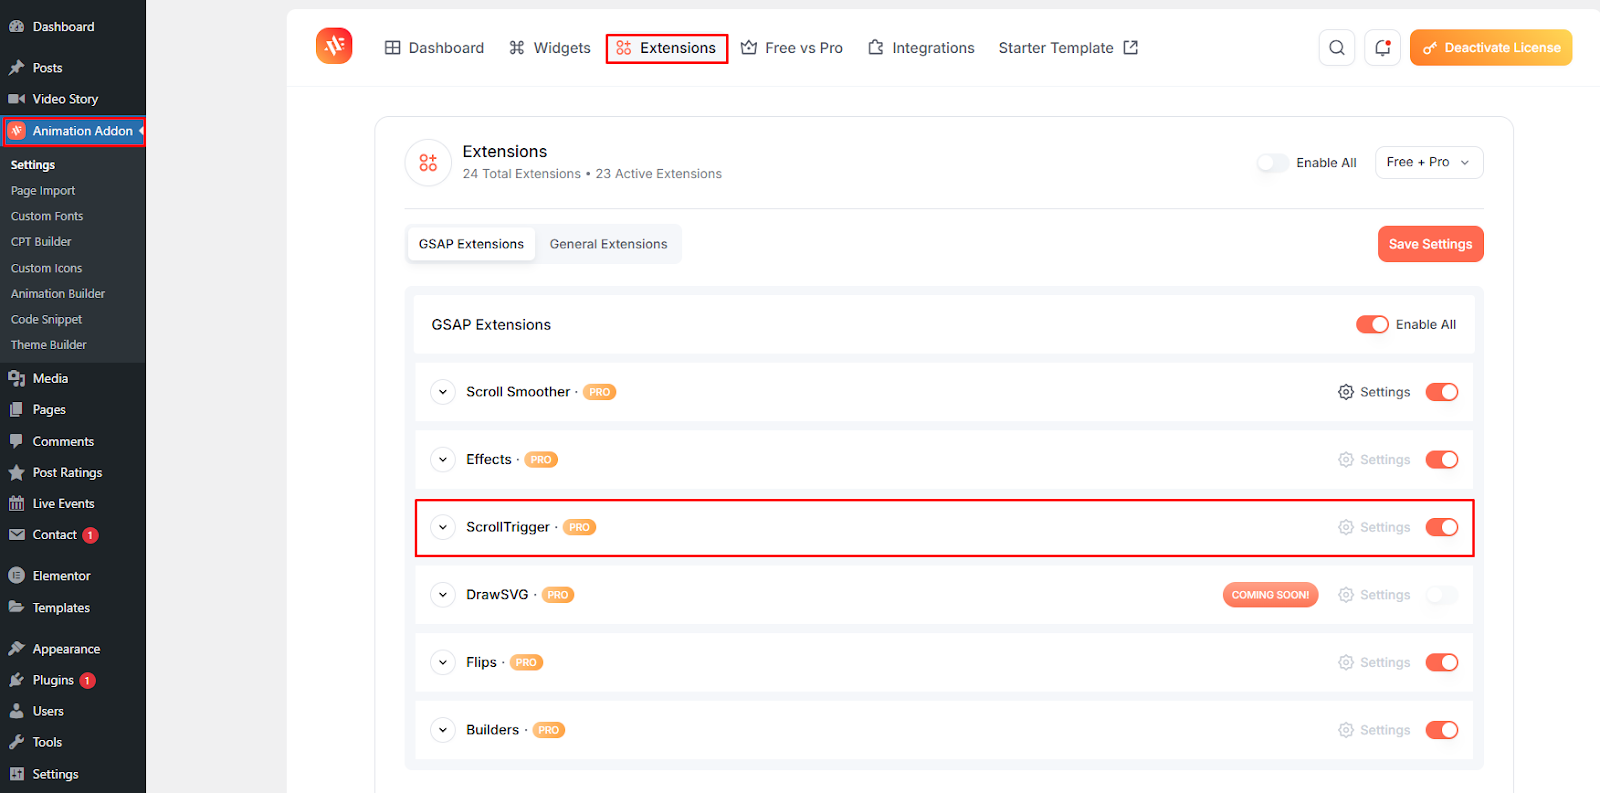
After that, go to Animation Addons from your dashboard. Click on Extensions and from that you will see ScrollTrigger. Enable the extension. Now, you can use ScrollTrigger for your website.
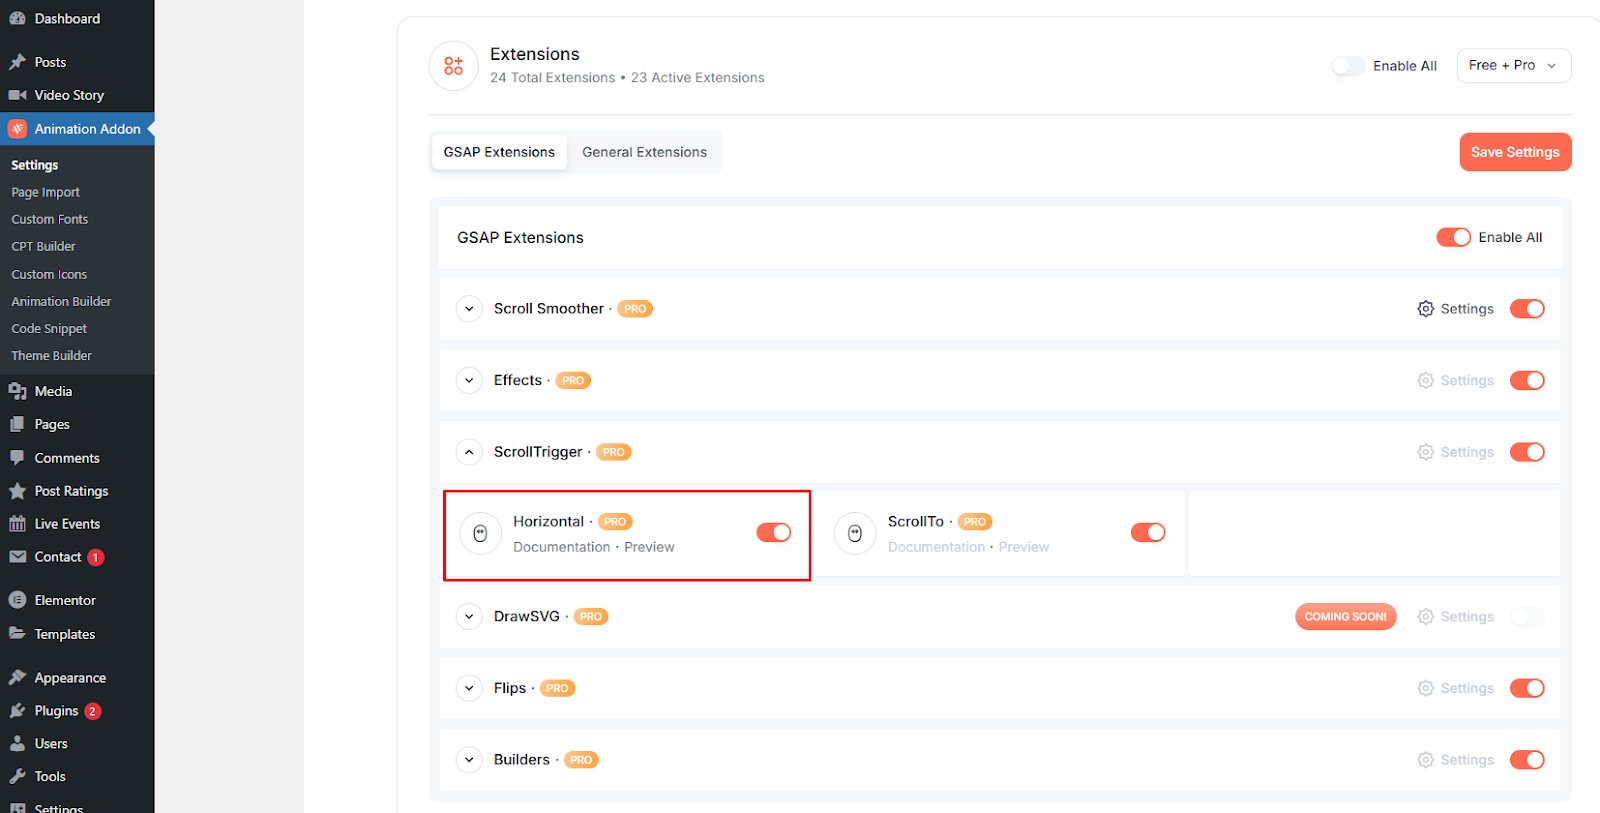
As there are many examples of ScrollTrigger, let’s see how horizontal scrolling works.
Step 3: Insert Images
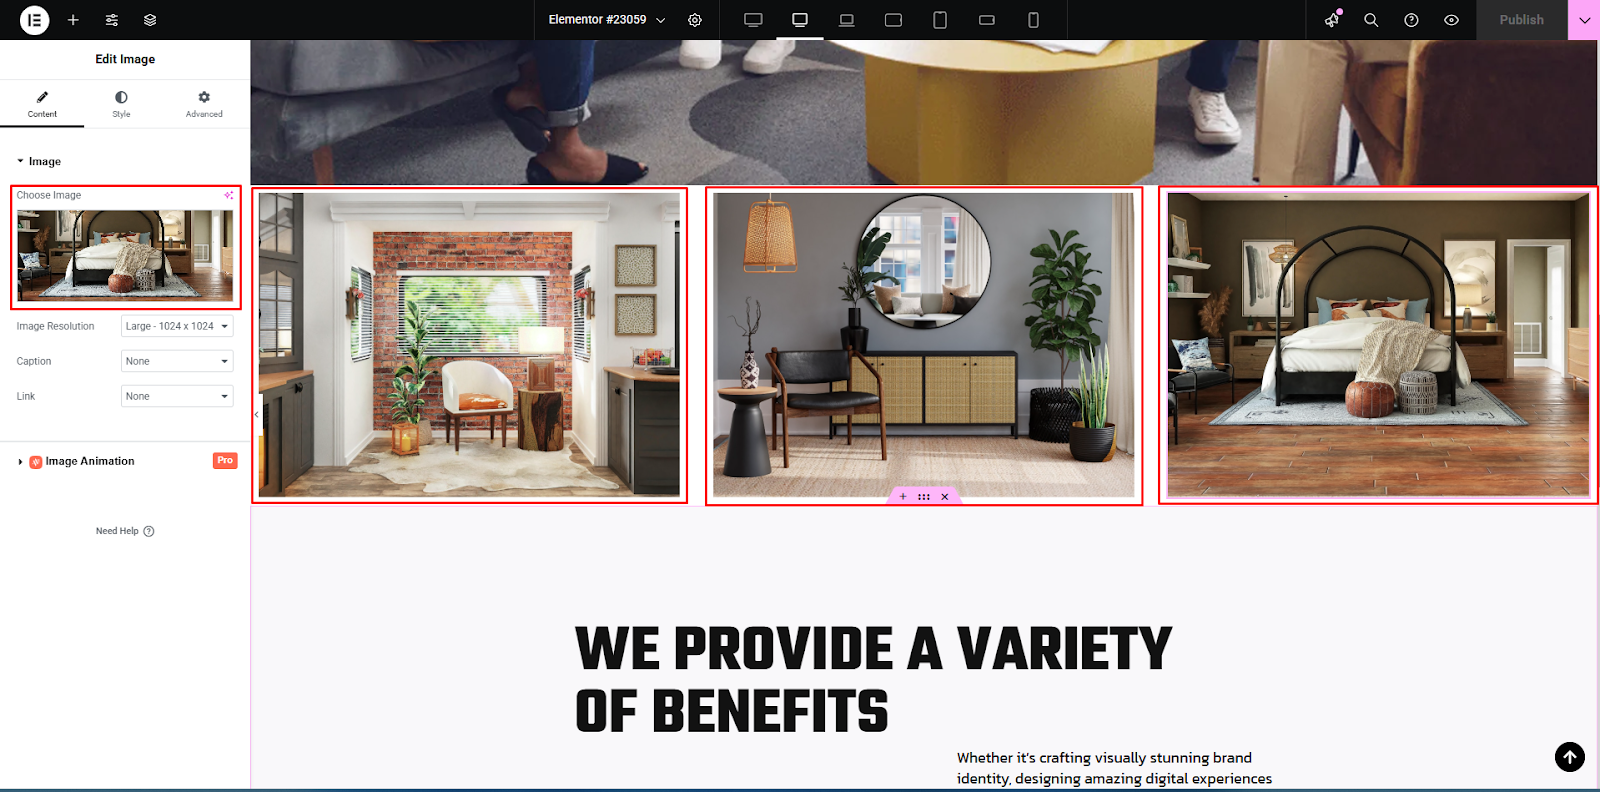
Here, we take 3 images to create horizontal scrolling. Just take a flex container layout and upload any 3 images you want to animate.
Step 4: Set the Content Width
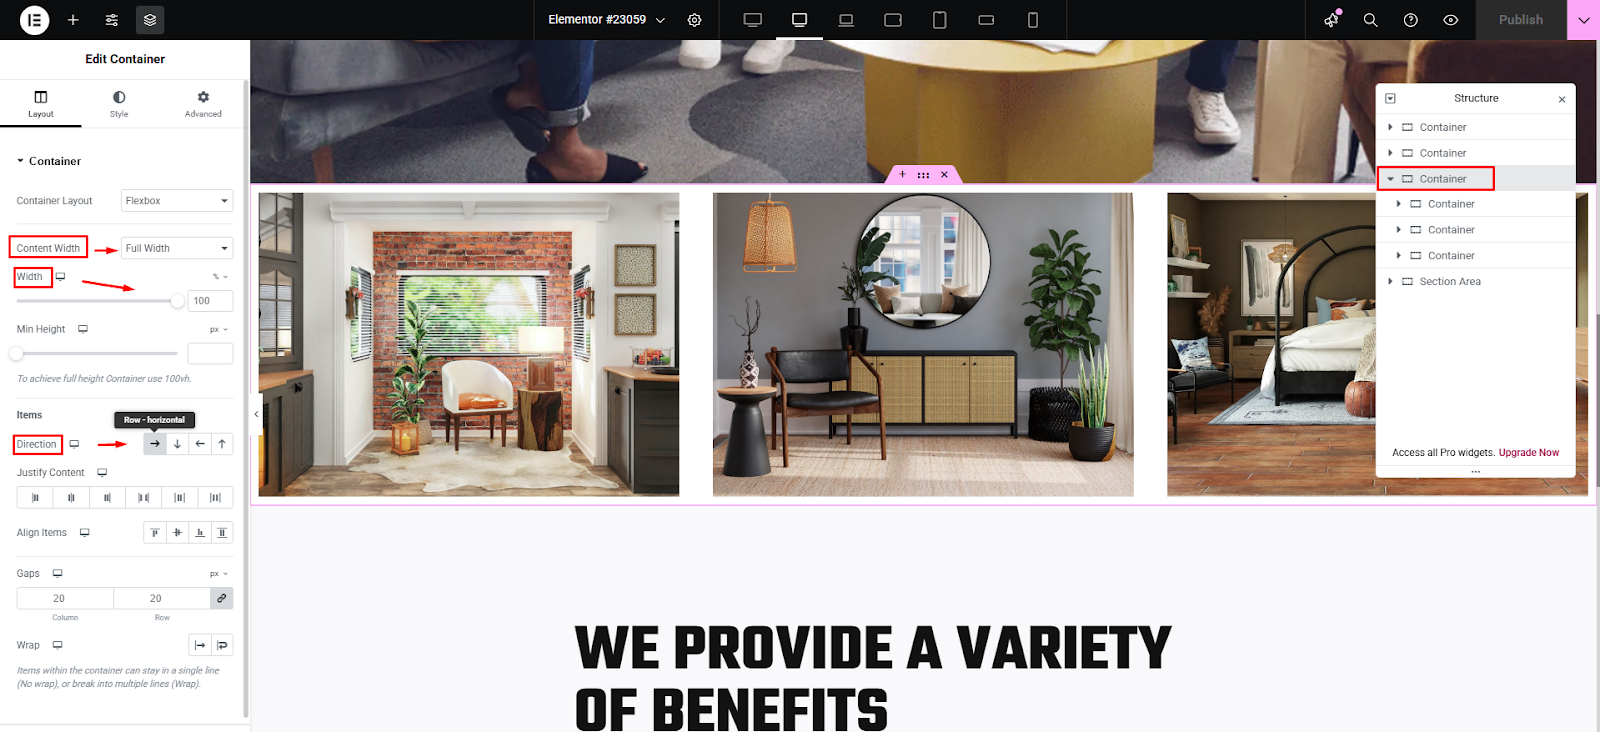
First, click on the container shown in the image. Make the content width set to “Full Width” so that horizontal scrolling works smoothly. Set the width to 100, as there are no hard and fast rules, you can change to any value as your requirement. Choose the direction to “Row-horizontal,” which moves the container to the left. You can also change the direction as you want.
Step 5: Apply Horizontal Scroll
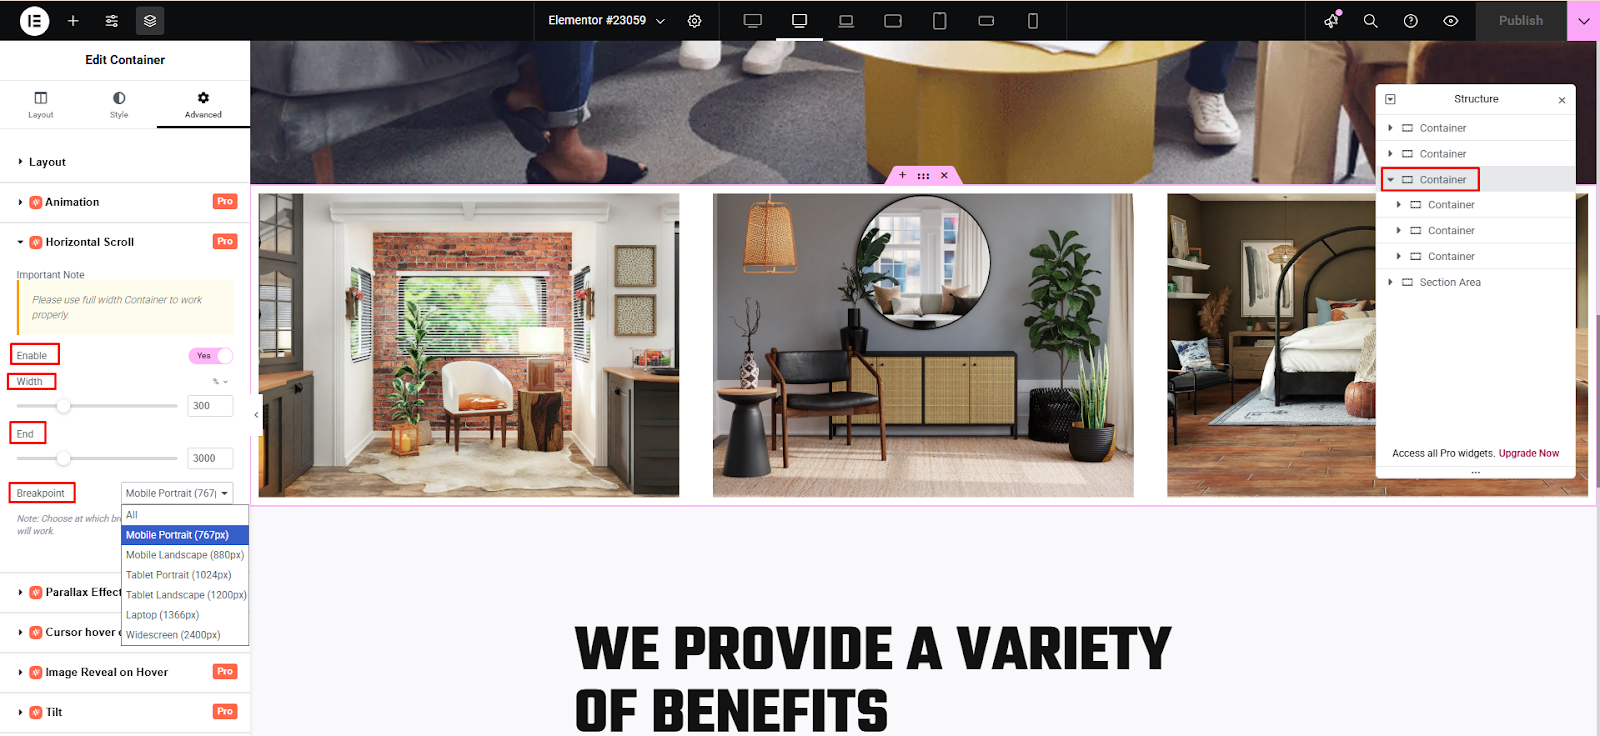
Go to the Advanced tab, where you’ll find the Horizontal Scroll option. Switch it to Yes to unlock the full set of settings. Next, adjust the Width according to the number of containers like 300 for three, 600 for six, and so on. Then, set the End value to control how far users must scroll before the animation stops.
For example, 3000 means the effect ends after 3000 pixels of scrolling. Finally, configure the Breakpoint to decide where the animation should apply like Mobile, Tablet, or Laptop, depending on your audience.
Step 6: Submit and Preview
Finally, click on the Publish and now you can enjoy the ScrollTrigger by using Horizontal scrolling.
Now, there are many effects of ScrollTrigger like ScrollTo, Nested Scrollmotion, Stack Card and many more. Here, we will give some examples of ScrollTrigger –
Nested Scrollmotion allows you to create scroll-based animations inside another scrolling container. It also provides more dynamic and interactive. It’s perfect for building complex layouts where inner elements animate smoothly as users scroll through sections.
Stack Cards create a visually engaging effect where cards overlap and slide into place as you scroll, almost like flipping through a deck. This effect works great for portfolios, product showcases, or storytelling-style pages.
Method 2: Add via Elementor (HTML / Custom Code)
Another simple method to add GSAP ScrollTrigger is adding via Elementor. There are two clean options: page-level (Elementor HTML widget) or site-wide (Elementor Pro → Custom Code). You can pick any one of them and follow the short steps below.
Step 1: Choose where to place scripts
Page-level : You can use an HTML widget on the page you’re editing (good for single-page effects).
Site-wide: Another way you can go to Elementor → Custom Code → Add New, paste scripts and set Location: Body End and Display Conditions (good for reusable site effects).
Step 2: Paste these scripts in the init script
Place both script tags, GSAP and ScrollTrigger, before your init script (HTML widget or Custom Code → Body End). Just copy the full code and paste in the init script.
					<script src="https://cdn.jsdelivr.net/npm/gsap@3/dist/gsap.min.js"></script>
<script src="https://cdn.jsdelivr.net/npm/gsap@3/dist/ScrollTrigger.min.js"></script>
<script>
document.addEventListener('DOMContentLoaded', function(){
  gsap.registerPlugin(ScrollTrigger);
  gsap.from('.fade-in', {
    opacity: 0,
    y: 40,
    duration: 1,
    ease: 'power2.out',
    scrollTrigger: {
      trigger: '.fade-in',
      start: 'top 85%'
    }
  });
});
</script>
Step 3: Add target class in Elementor
Select any widget/section → Advanced → CSS Classes → enter:
fade-in
You can use different class names for different effects. Through editor preview you can always Preview Changes or open the published page. Now, scroll through the website to test the animation.
Method 3: Using GSAP Library via CDN
You can follow the step by step process if you prefer to use the GSAP library.
Step 1 : Create a custom JS file
In your theme (preferably a child theme), create a folder named js and add a file called gsap-custom.js, where you’ll write your animation code. Never edit a parent theme directly. If you edit the parent theme, you could overwrite the changes accidentally.
gsap-custom.js
Step 2 : Add enqueue code in child theme
Open your child theme’s functions.php and paste this code below. Here, you will enqueue the GSAP core file, ScrollTrigger plugin file and your custom JS file respectively.
					function load_gsap_scrolltrigger() {
    // GSAP core
    wp_enqueue_script( 'gsap', 'https://cdn.jsdelivr.net/npm/gsap@3/dist/gsap.min.js', array(), null, true );
    // ScrollTrigger plugin
    wp_enqueue_script( 'gsap-scrolltrigger', 'https://cdn.jsdelivr.net/npm/gsap@3/dist/ScrollTrigger.min.js', array('gsap'), null, true );
    // Your custom JS file
    wp_enqueue_script( 'gsap-custom', get_stylesheet_directory_uri() . '/js/gsap-custom.js', array('gsap','gsap-scrolltrigger'), null, true );
}
add_action( 'wp_enqueue_scripts', 'load_gsap_scrolltrigger' );
Step 3 : Add animation code in custom JS file
Now, we will use an animation effect when you scroll through the website. Here, we will use the fade-in effect when scrolling.
					gsap.registerPlugin(ScrollTrigger);

gsap.from(".fade-in", {
  opacity: 0,
  y: 50,
  duration: 1,
  scrollTrigger: {
    trigger: ".fade-in",
    start: "top 80%"
  }
});
Step 4 : Add class in Elementor
In Elementor, select the widget/section → Advanced → CSS Classes → add:
fade-in
Now, when you scroll, that section will fade in. You can change the class name and animation settings for different effects.
Ready to Build GSAP ScrollTrigger Animations?
With Animation Addons, you can create GSAP-powered animations directly in Elementor without relying on custom JavaScript. Explore its animation features, widgets, extensions, and templates to build more interactive websites faster.
Explore with Animation AddonsWhere Should You Use ScrollTrigger?
ScrollTrigger works best when scrolling is part of the storytelling rather than just a way to move through a page. From revealing key content to guiding users through complex visuals, these scroll-based interactions can make important sections feel more dynamic and memorable.
SaaS Websites
Use ScrollTrigger to introduce product features, dashboards, and workflows as users scroll through the page. Staggered reveals, pinned sections, and animated product visuals can turn a static SaaS landing page into an interactive product story.
Portfolio Websites
ScrollTrigger is ideal for showcasing creative work through immersive transitions, horizontal galleries, parallax effects, and project reveals. Designers, developers, and agencies can use these effects to create a portfolio experience that feels as distinctive as the work itself.
E-commerce
Bring product pages to life by revealing product images, features, specifications, and benefits at the right moment during scrolling. Subtle animations can guide attention toward important details without distracting users from browsing or purchasing.
Landing Pages
Use ScrollTrigger to control how headlines, images, testimonials, and calls to action appear as visitors move down the page. Carefully timed animations can create a stronger visual flow and help guide users toward key conversion points.
Case Studies
Turn a traditional case study into a visual story by revealing research, processes, results, screenshots, and metrics progressively. Pinning and scroll-linked animations can help users follow each stage of a project without overwhelming them with information all at once.
Common ScrollTrigger Problems and Fixes
Even a well-configured ScrollTrigger animation can behave unexpectedly when selectors, scripts, responsive settings, or page layouts are not set up correctly. Understanding the most common issues makes troubleshooting faster and helps you build animations that work consistently across Elementor, WordPress, and different screen sizes.
ScrollTrigger Animation Isn’t Working
If the animation doesn’t trigger, first check that GSAP and ScrollTrigger are loaded correctly and that ScrollTrigger has been registered with GSAP. Also verify that your trigger selector exactly matches the CSS class or element you are targeting.
Animation Works in the Editor but Not on the Live Page
Elementor’s editor and the published frontend can load scripts differently, so an animation may appear correctly during editing but fail after publishing. Clear Elementor and website caches, then check that your JavaScript is loading on the frontend and that there are no console errors.
Animation Starts at the Wrong Position
An animation that begins too early or too late usually needs its start or end values adjusted. Use markers: true while developing to visually identify the trigger positions and fine-tune them for your layout.
Pinning Behaves Unexpectedly
Pinned elements can behave differently depending on their parent containers, positioning, and page structure. Check the surrounding Elementor containers and adjust the pin, start, and end settings if the element jumps, overlaps, or stops pinning correctly.
Scroll Animation Is Too Fast or Too Slow
When an animation doesn’t feel synchronized with scrolling, adjust the scrub, start, and end values rather than simply changing the animation duration. A longer scroll distance or a suitable numeric scrub value can create a smoother, more controlled experience.
Animation Breaks on Mobile
Desktop animations don’t always translate well to smaller screens, particularly horizontal scrolling and pinned layouts. Use responsive conditions to simplify or disable complex ScrollTrigger effects on mobile and test the result on real devices.
Multiple Animations Interfere With Each Other
When several ScrollTriggers target the same elements or overlap heavily, animations can conflict and produce unpredictable results. Organize related animations into timelines, use unique triggers, and keep the number of active ScrollTriggers reasonable.
Performance Feels Slow While Scrolling
Heavy animations, large images, excessive effects, and too many simultaneously running ScrollTriggers can make scrolling feel sluggish. Prioritize lightweight properties such as transform and opacity, reduce unnecessary animations, and optimize the page’s images and other assets.
ScrollTrigger Stops Working After Dynamic Content Changes
If content is added, resized, or changed after ScrollTrigger has initialized, its calculated positions may no longer match the page layout. In such cases, refreshing ScrollTrigger after the layout has settled can help it recalculate the correct trigger positions.
- Tip: When troubleshooting, start with the basics, check the browser console, verify your selectors, enable
markers, and confirm that GSAP and ScrollTrigger are loaded correctly. This simple process can quickly identify whether the problem comes from your code, Elementor structure, or responsive layout.
Best Practices for Using GSAP ScrollTrigger
Creating smooth ScrollTrigger animations is not just about making elements move on the screen—it’s about making those interactions purposeful, responsive, and lightweight. Follow these best practices to keep your scroll animations visually engaging without compromising usability or website performance.
Keep Animations Purposeful
Use animation to guide attention, explain content, or improve the browsing experience rather than adding motion to every element. Subtle reveals, transitions, and scroll-linked effects often work better than excessive movement.
Animate Only What Matters
Avoid creating ScrollTriggers for every element on the page, especially when several elements can be animated together. Group related elements into a single timeline or animation where possible to keep your implementation cleaner and more efficient.
Use transform and opacity
For smoother animations, prioritize properties such as transform and opacity instead of frequently changing layout-related properties. This can help reduce unnecessary browser rendering work and keep scrolling feeling more responsive.
Make Animations Responsive
An animation that looks impressive on a large screen may feel crowded or distracting on mobile. Use responsive conditions to simplify, adjust, or disable complex ScrollTrigger effects on smaller screens when necessary.
Test Start and End Positions
Don’t rely on default trigger positions for every animation. Adjust start and end values and test them across different screen sizes to make sure animations begin and finish at natural points.
Use Markers While Developing
Enable markers during development to see exactly where your ScrollTriggers start and end. Once the animation is working correctly, remove or disable the markers before publishing the page.
Respect Reduced Motion Preferences
Some visitors may prefer less motion because of accessibility or personal preferences. Provide a reduced-motion experience by simplifying or disabling non-essential ScrollTrigger animations when the user’s system requests reduced motion.
Test on Real Devices
Always test scroll animations on desktop, tablet, and mobile devices rather than relying only on the Elementor editor or desktop browser. Pay particular attention to pinned sections, horizontal scrolling, and complex timelines, as these can behave differently across screen sizes.
Keep the User Experience First
The best ScrollTrigger animation is one that supports the content without getting in the way. Keep transitions smooth, avoid excessive movement, and make sure users can still understand and interact with the page even when animations are disabled.
Final Words
Incorporating GSAP ScrollTrigger into your WordPress and Elementor projects is one of the best ways to make your website feel dynamic and interactive.
ScrollTrigger gives you the flexibility to bring your designs to life without overwhelming complexity. By following best practices and keeping animations purposeful, you’ll not only capture your visitors’ attention but also create a professional user experience that keeps them engaged and coming back.
FAQs
No, Elementor does not provide GSAP ScrollTrigger as a native feature; ScrollTrigger is a separate plugin from GSAP that must be loaded and registered separately.
Yes, ScrollTrigger is available as part of the freely available GSAP libraries and can be loaded through CDN, npm, or other supported installation methods.
Yes, you can use GSAP ScrollTrigger with regular Elementor by adding the required GSAP and ScrollTrigger scripts through your theme, a code/plugin solution, or another supported method. Elementor Pro’s Custom Code feature is convenient for managing JavaScript, but it isn’t required to use GSAP itself.
You can load GSAP and ScrollTrigger using their CDN files, register the plugin with gsap.registerPlugin(ScrollTrigger), and then create your scroll-based animations with JavaScript. GSAP officially supports WordPress and provides CDN and npm installation options.
Set the Elementor section or container as the ScrollTrigger’s trigger and use pin: true to keep it fixed between the defined start and end positions. ScrollTrigger automatically manages the space created by the pinned element, making it suitable for sticky storytelling and scroll-based layouts.
Common causes include not loading or registering ScrollTrigger correctly, using an incorrect CSS selector, or running the animation before the target elements are available. Make sure GSAP and ScrollTrigger are loaded in the correct order and register the plugin before creating your animations.
For responsive control, use gsap.matchMedia() to create ScrollTrigger animations only for the screen sizes where you need them, and let GSAP automatically revert those animations when the media query no longer matches. This approach can also be used to provide simpler animations—or no ScrollTrigger animation at all—on mobile devices.
ScrollTrigger is performance-friendly when used correctly. Problems usually come from excessive animations, oversized images, or too many effects running together. Use purposeful motion, optimized assets, and mobile testing to maintain speed.
Adjust animation settings for desktop, tablet, and mobile separately. Keep movements subtle, avoid effects that block content, and respect reduced-motion preferences so visitors who disable animation can still use the website comfortabl

Leave a Reply